
You just can’t get enough of the sport rugby. The athletics, the maneuvers, and the thrill of scoring a try. It doesn’t get old, and it never will. Unfortunately, it’s not the safest sport either. Any player, albeit a novice or a pro, can get injured from time to time. In fact, these are some of the most common injuries seen on the rugby field — many of which the techniques below are designed to help prevent or manage.
This is where rugby taping comes in. Not only does it nurse already existing injuries back to health, but it also helps the players protect their joints from getting injured in the first place. For a deeper look at why this works, taping as a treatment for joint stability explains the physiotherapy principles behind these techniques. Some specific techniques even enhance players’ overall performance.
In this article, you’ll see the various rugby taping techniques you can use for yourself. Look through which ones will benefit you the most.
The Types of Rugby Taping
As players do, you use several key parts of your body when playing rugby. Most of the techniques below rely on sports tape and strapping — having the right rolls of EAB and zinc oxide tape on hand makes a real difference in how clean these wraps come out. You’ll get a variety of techniques for different areas of the body. If you’re either in need of proper injury coverage or support, choose the best rugby taping technique for you below:
Shoulder Taping Technique
This taping technique limits external rotation and horizontal extension of the shoulder. Tape up your shoulder properly with this rugby taping technique.

Materials:
- Elastic Adhesive Bandage (preferably 7.5cm)
- Zinc Oxide Tape (preferably 3.8cm)
Steps:
- Ask the player to put their hand on their hip while they’re sitting down.
- Unfurl the EAB tape and wrap it around the midpoint of the upper arm as an anchor.
- With the zinc oxide tape, add a couple more anchors on the shoulder of the player.
- At the back of the arm, stretch a strip of the tape from the lower anchor to the end of the upper anchor. Do the same at the front and with the other end of the upper anchor.
- Cross another piece of tape from the lower back anchor to the upper front anchor.
- Repeat steps 4 to 5 to give it a good solid structure. You can even fill in the gaps between some of the strips as needed.
- Finish off by placing more layers on and around the existing anchors to lock off the straps in place.
Basic Ankle Taping Technique
This rugby taping technique provides stability to the lateral ligaments and CFL deficiencies. Once the tape comes off, a supportive ankle brace or insole (stretch) can help maintain that same stability during recovery and everyday training.

Materials:
- Fixation Tape (preferably 10cm)
- Zinc Oxide Tape (preferably 3.8cm)
- Elastic Adhesive Bandage (preferably 5-7.5cm)
- Overwrap (optional)
Steps:
- With the sole up, stick a patch of fixation tape on the front and the back of the ankle. It gives the anterior, posterior, and Achilles joint lines some added protection.
- Firstly, put a loose layer of zinc oxide tape around the ankle. This piece will serve as an anchor to the rest of the strapping. Make sure to not restrict any blood flow to the rest of the foot.
- The next step depends if the instability is lateral or medial. If it’s lateral, start medially (the part closer to the center of the body) then pull under and end laterally (the part closer to the side of the body). If it’s medial, start laterally then pull under and end medially.
Place the zinc oxide tape on the side of the anchor you wish to start with. Pull the tape under the foot, and bring it up to the other side. Always remember to place it on the anchor. Do this two to three times.
- Do step 3 again, but end it diagonally. The tape will either round off at the same point or at least near it. Repeat once or twice.
- Lastly, stretch the tape diagonally from either the medial or lateral. Lead the roll behind the joint line.
- Instead of going back up to the anchor tape, the strip goes down under the heel and goes back up to the starting point.
- Again, repeat steps 5 to 6, but in the opposite direction (medial if you used lateral first, and vice versa). Do both a couple of times as needed.
- Close everything off by putting another layer of tape around the ankle.
- If you want more support, add more wraps along the ankle with an overwrap or an EAB. Plus, include steps 3 through 8 in a continuous band.
Mild Lateral Ligament Sprain to the Ankle Taping Technique
If a player has a syndesmosis injury or their foot unexpectedly rolls underneath them, this technique will be of use. Pairing this kind of taping with balance and stability training (stretch) is a common way physiotherapists help players rebuild proprioception after a lateral ankle sprain.

Materials:
- Elastic Adhesive Bandage (preferably 7.5cm)
- Zinc Oxide Tape (preferably 3.8cm)
Steps:
- The foot should be elevated, with the sole facing forward. Begin the base by putting the EAB tape on the top or bridge of the foot. Work your way under to the sole.
- Once the tape goes back up to the bridge, change direction and give the bottom of the ankle a good once around.
- Wrap the bridge of the foot again. Then, get the tape to partially cover the heel.
- To do a proper heel lock, get back up to the bridge of the foot. Then, instead of wrapping it under the sole, head straight to the side and the back of the ankle. Once there, slant the tape under the heel.
- Finish off the first layer of tape by tearing it off and fastening it on the ankle.
- Now, for the zinc oxide tape to reinforce the base. Place a long strip from the front of the ankle, going down mid-heel, and back up on the other side of the front ankle to tear it off. Do this technique again, and close it off at the end of the other strip.
- You can even do another heel lock with the zinc oxide tape. Start at the front of the ankle, then to the side and the back of the heel, and the other side. End by going under the heel and securing the tape at the front ankle again.
- Lock all the layers by going around the ankle and tearing off the tape.
Lineout Strapping Taping Technique
Lineout, or lifting, blocks are placed on the thighs of some rugby players. Lifters use them to lift their comrades in the lineouts.

Materials:
- Rugby Lifting Block
- Elastic Adhesive Bandage (preferably 7.5cm)
Steps:
- Get your EAB tape ready.
- While sitting down, put the rugby lifting block on top of your thigh. It should be nicely nestled in the middle there.
- Wrap the tape over the block and under your leg until it comes back up.
- Keep the tape going. This time, wrapping over the lower edge of the first one.
- Wrap it again, and now, covering the upper edge of the middle strip of tape.
- Do this a couple of times until the lifting block is securely in place.
- Give the taped leg a good squeeze. It pats down the tape, making sure that it’s tight enough.
Elbow Support and Hyperextension Taping Technique
Elbow hyperextension is a bit common in rugby. If you as the player got caught awkwardly in a tackle, use this rugby taping technique.

Materials:
- Elastic Adhesive Bandage (preferably 7.5cm)
Steps:
- Let the player rest their hand and/or arm on you. The arm should be flexed a bit.
- Start wrapping the tape on the lower part of the upper arm. Do it once or twice.
- Then, angle the tape down a little over the inside of the flexed elbow. Don’t press the tape down. Let it hover just a little bit. The tape should go down to the other side of the forearm.
- Wrap the tape once or twice around the forearm, before crossing over to the other side of the upper arm and over the elbow again. This pattern makes a figure 8.
- Repeat the process up to 3 times to strengthen the bond of that tape.
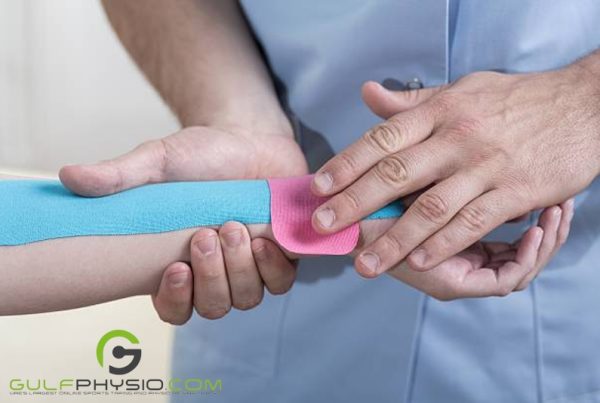
Wrist Sprain Taping Technique
Consider this rugby taping technique if you experience a wrist sprain. Wrist sprains happen when a player uses a weight wrong or if they land awkwardly on their hands.

Materials:
- Elastic Adhesive Bandage (preferably 5cm)
Steps:
- With the hand relaxed, let the thumb and the palm face up.
- Place the tape first, unrolling it, a little bit under the wrist. Do one or two complete wraps.
- Then, angle the tape towards the side of the palm, opposite the thumb.
- Keep unrolling the tape under the hand until it comes over the gap between the thumb and the index finger.
- Follow through with the tape as it goes toward the wrist. Wrap it around there again.
- Repeat steps 3 to 5 a couple of times (even up to 3). This ensures that the wrist is well-protected.
Shoulder Strapping Taping Technique
This rugby taping technique can be used to prevent injury to your shoulders and to lessen pain.

Materials:
- Fixation Tape (preferably 10cm)
- Zinc Oxide Tape (preferably 3.8cm)
- Elastic Adhesive Bandage (preferably 7.5cm)
Steps:
- Use a couple of layers of fixation tape on the shoulder as the anchors. Usually, the placement requires around 4 to 6 strips in total to cover the area. Three strips will be on the upper arm going into the shoulder, while there will be a couple of strips going from the back to the front on the shoulder itself.
- After that, zinc oxide tape will be used, mainly for support. You’ll place the tape in what’s called a three-stripe motion as its base. Place one stripe in the middle, from the base of the fixation tape to the top of the shoulder. It’ll end right below the neck.
- The next strip will come from the front and its end will converge with the middle strip. Same with the third one from the back.
- Now, just fill in the gaps between the three stripes. Covering all the in-betweens, it should give you a basic lift.
- Next, place a couple of strips of tape at a 45° angle from front to back and from back to front. These should start These would cross together like an X.
- Then fasten the top edges by putting more strips over the shoulder. It’ll pin the shoulder down.
- EAB tape is then used to anchor off the base of the tape job. Wrap the tape several times on the edge of the layers. It should be on the midway of the upper warm.
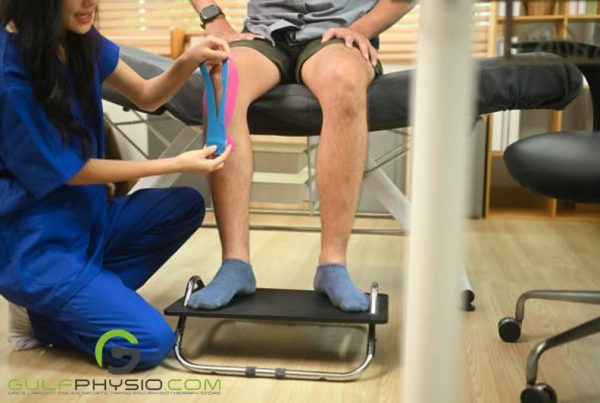
Knee, MCL, and Joint Support Taping Technique
If you need medium joint support or you have MCL strains on the inside of your knees, do this rugby taping technique.

Materials:
- Fixation Tape (preferably 10cm)
- Zinc Oxide Tape (preferably 3.8cm)
- Elastic Adhesive Bandage (preferably 7.5cm)
Steps:
- Place a layer of fixation below and above the ligament or affected area. These strips will serve as the anchor. If it needs additional glue, you can use an adhesive spray.
- Using the zinc oxide tape for stability, put several strips from the upper fixation tape to the lower one. The tape points, somewhat curving around the inner knee and aligning with the fibres of the MCL. Place one or two layers.
- Get more strips of tape and crisscross them with each other. All the while, avoiding covering the knee itself.
- Next, get your EAB. Overwrap the knee in a nice figure eight. The figure eight starts with wrapping the tape over the upper fixation tape band for a couple of rounds.
- Then, the tape coming from over the knee, slant the wrap downwards like the middle part of an 8.
- Wrap the tape around the lower fixation tape strip a couple of times. Then, angle it going up, crossing the line between the upper and lower fixation tape layers.
- Repeat the figure eight once or twice, depending on the support the player requires.
- Tear off the tape and secure it in place.
Thumb Support Taping Technique
Sprained thumbs do happen. Doing this rugby taping technique helps prevent any additional injury to your already sore thumbs.

Materials:
- Elastic Adhesive Bandage (preferably 2.5cm)
Steps:
- Put the arm out with the thumb standing up.
- Place the end of the tape on the top first, right below the wrist. This way, the tape is going down when you start wrapping.
- Wrap the tape once around your arm. Wrap it again, but this time, with the tape going over the wrist. The tape is angling towards the thumb.
- On the third wrap, lead the roll under and then behind the thumb. Wrap it around the thumb, then back around the wrist.
- Repeat step four 2-3 times, depending on the level of support you need.
- Finish off the wrap by securing the end around the wrist again. The tape should be in the same position as you started.